How to Make Potions in Minecraft: Complete Brewing Guide (2026)
Potions are the closest thing Minecraft has to magic: fire immunity for the Nether, breathing underwater, seeing in the dark, falling slowly from any height. If you have ever wondered how to make potions in minecraft, the good news is the whole system runs on one block, one base ingredient, and a short list of effect ingredients you mostly already have in a chest somewhere. This guide covers the full setup, every effect ingredient and what it brews, the modifiers that change duration and strength, and the Bedrock-only cauldron trick that Java players do not get.
What You Need to Start Brewing
The brewing stand is crafted from 1 blaze rod + 3 cobblestone (the rod in the top-middle slot, cobblestone across the bottom row). That means one trip to a Nether fortress — blaze rods only drop from blazes — before your brewery opens. Our portals guide covers getting there and back alive. You can also find ready-made brewing stands in igloo basements and on End ships, and every village cleric’s house is built around one (it is the cleric’s job site block).
You also need:
- Blaze powder as fuel. Craft blaze rods into powder and put it in the stand’s fuel slot. One blaze powder fuels 20 brewing operations, so a single blaze rod (2 powder) runs a small brewery for a long time.
- Glass bottles. Craft 3 glass into 3 bottles, fill them from any water source or cauldron. Every potion starts life as a humble water bottle.
- Nether wart. Found growing in Nether fortresses and bastion remnants. Plant it on soul sand at home — it is the base ingredient for almost everything, so a small wart farm is step zero of any serious brewing setup.
Each brewing operation takes 20 seconds and processes up to three bottles at once with a single ingredient — always brew in threes to save ingredients and fuel.
Step by Step: Your First Potion
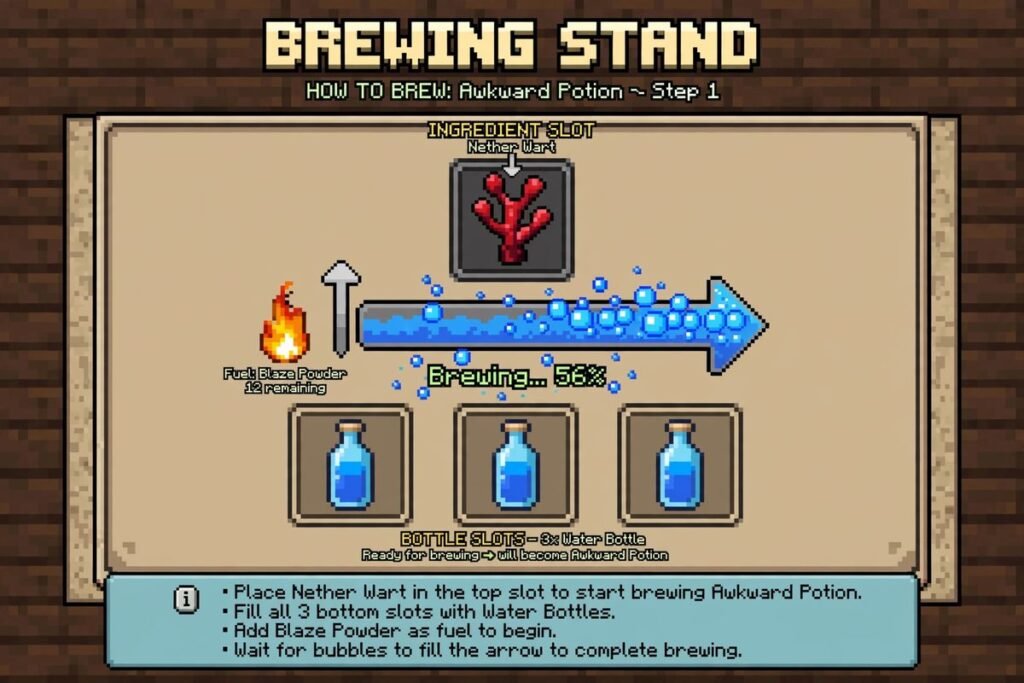
- Put blaze powder in the fuel slot (top-left) of the brewing stand.
- Place up to three water bottles in the bottle slots.
- Put nether wart in the ingredient slot (top). Wait 20 seconds.
- Your water bottles are now awkward potions — no effect, but they are the base almost every real potion is built from. Do not drink them.
- Add an effect ingredient (table below) and wait another 20 seconds.
- Optionally add modifiers — redstone, glowstone, gunpowder or dragon’s breath — to tune the result.
Skip step 3 with almost any ingredient and you get a useless mundane potion instead; the nether wart step is the one beginners miss. The one famous exception: a fermented spider eye added straight to a water bottle makes a potion of Weakness — the only useful potion that needs no nether wart at all, and the one you will want for curing zombie villagers.
Every Effect Ingredient (The Complete Table)
Add these to an awkward potion. The “corrupted” column shows what you get if you later add a fermented spider eye to the finished potion — corruption usually reverses the effect, which is how most negative potions are made.
| Ingredient | Potion effect | Corrupted version |
|---|---|---|
| Sugar | Swiftness (speed) | Slowness |
| Rabbit’s foot | Leaping (jump boost) | Slowness |
| Glistering melon slice | Healing (instant health) | Harming (instant damage) |
| Spider eye | Poison | — |
| Blaze powder | Strength | Weakness (Bedrock) |
| Golden carrot | Night Vision | Invisibility |
| Ghast tear | Regeneration | — |
| Pufferfish | Water Breathing | — |
| Magma cream | Fire Resistance | — |
| Turtle shell (helmet) | Turtle Master (Slowness + Resistance) | — |
| Phantom membrane | Slow Falling | — |
| Fermented spider eye | Weakness (from water bottle or awkward) | — |
| Breeze rod | Wind Charged | — |
| Stone | Infested | — |
| Cobweb | Weaving | — |
| Slime block | Oozing | — |
The last four are the newer trial-chamber-era potions: Wind Charged makes the drinker burst out a gust of wind when they die, Infested can spawn silverfish when the drinker takes damage, Weaving spreads cobwebs on death, and Oozing spawns two slimes on death. They are mostly for adventure maps and mischief — the first twelve rows are your everyday kit. A few durations worth remembering: Swiftness, Strength, Night Vision, Water Breathing, Fire Resistance and Invisibility all last 3:00 in base form; Regeneration lasts 0:45; Slow Falling 1:30; Weakness 1:30; and Healing/Harming are instant, with no timer at all.
Modifiers: Longer, Stronger, Throwable
After the effect ingredient, one more ingredient changes the potion’s shape. You generally choose either longer or stronger — a potion cannot be both extended and enhanced.
| Modifier | What it does |
|---|---|
| Redstone dust | Extends duration — most 3:00 potions become 8:00; Weakness becomes 4:00. No change to strength. |
| Glowstone dust | Raises the effect to level II — stronger, but shorter (Swiftness II lasts 1:30). Instant potions just hit harder. Cannot be combined with redstone extension. |
| Gunpowder | Turns the potion into a splash potion you can throw — for healing teammates, harming groups of mobs, or splashing weakness onto a zombie villager. |
| Dragon’s breath | Turns a splash potion into a lingering potion, leaving a cloud on the ground. Lingering potions last one quarter of the normal duration — and are the Java route to tipped arrows (Bedrock has a better way, below). |
| Fermented spider eye | Corrupts the potion into its opposite or negative form — see the table above. |
Dragon’s breath is collected by using an empty glass bottle on the Ender Dragon’s breath attack during the boss fight — scoop it up mid-battle and keep a few bottles spare, because there is no other source.
The Bedrock Cauldron Trick (and Tipped Arrows Without a Dragon)
Bedrock Edition gives cauldrons a second job that Java does not have: a cauldron can store potions. Use a potion on an empty cauldron and it fills with that potion (up to three bottles’ worth). Then use arrows on the filled cauldron and they come out as tipped arrows of that effect — no dragon’s breath, no lingering potions, no End trip required. It is by far the easiest way on mobile to make arrows of Harming, Poison or Slowness, and the potion stays in the cauldron between uses until it runs out.
One more Bedrock cauldron note: witch hut cauldrons on Bedrock sometimes already contain a random potion when you find them — always worth a tap before you move on. For everyday brewing the stand is still king, but keep a cauldron in the brewery for arrows and storage.

Which Potions Are Actually Worth Brewing?
- Fire Resistance (magma cream, extend with redstone to 8:00) — the Nether becomes a different, calmer place. Essential before any serious blaze or bastion work.
- Night Vision (golden carrot, 8:00 extended) — caving and ocean monuments without torch spam.
- Slow Falling (phantom membrane) — your insurance policy for End cities and the dragon fight.
- Strength (blaze powder) and Swiftness (sugar) — the combat and travel staples.
- Healing (glistering melon) — brew it as a splash potion: instant recovery you can throw at your own feet mid-fight.
- Water Breathing (pufferfish) — ocean monuments and underwater building.
- Weakness (fermented spider eye, splash form) — not for enemies, for curing zombie villagers and unlocking your best trading discounts.
Setting Up a Small Home Brewery
Once the basics click, a little infrastructure makes brewing nearly free:
- A nether wart farm. Wart grows on soul sand anywhere (it does not need the Nether, just soul sand to sit on). A 9×9 patch beside your stand means you will never run out of awkward bases. Bone meal does not work on nether wart — it grows in slow stages on its own, so plant more rather than trying to rush it.
- An infinite water corner. A 2×2 water source next to the stand lets you refill bottles endlessly without walking to a river; a cauldron under a dripstone-and-water setup refills itself too, but a simple water pool is faster.
- Stock the shelf by ingredient, not by potion. Sugar cane, spider eyes, magma cream, ghast tears and golden carrots all have other uses, so keep a dedicated “brewing chest” and restock it after every Nether or farm run. Blaze powder belongs in the stand itself — with 20 operations per piece, one forgotten stack in a chest is a brewery that never starts.
- Brew in full batches. Three bottles, full modifier chain, then store. A chest of finished emergency potions (splash healing, fire resistance, slow falling) next to your bed is worth more than a chest of ingredients when a raid horn sounds or you fall into a lava lake.
- Take the stand’s neighbors into account. A cleric villager needs a brewing stand as its job block, so if you are also building a trading hall, give the cleric its own stand — stealing the village brewery every time you need potions gets old fast.
Troubleshooting
My potion came out “mundane” or “thick” and does nothing. You skipped the nether wart. Only awkward potions accept effect ingredients — mundane (redstone/other ingredient first) and thick (glowstone first) potions are dead ends you can only throw away (on Bedrock they can at least be corrupted into Weakness).
The stand won’t start. Check the fuel slot: brewing stands run on blaze powder, not coal, and the fuel is consumed per operation, not per bottle.
Can I add both redstone and glowstone? No — extended and enhanced cancel out; the stand simply will not accept the second modifier. Pick duration or power per batch.
Witches keep dropping potions — can I just farm those? Witches drop the potion they were drinking (healing, swiftness, fire resistance, water breathing), which is handy but unreliable. Brewing is faster, targeted, and the only way to get most effects.
Frequently Asked Questions
Do all potions need nether wart?
No — but almost all do. The potion of Weakness (fermented spider eye in a water bottle) is the only useful potion brewed without an awkward base. Everything else starts with nether wart.
How long does brewing take?
20 seconds per operation, and one ingredient brews all three bottles in the stand at once. A full potion with a modifier takes about a minute from water bottle to finished splash potion.
How do I make a splash potion?
Add gunpowder to any finished potion in the brewing stand. Add dragon’s breath after that to make it lingering instead.
What is the easiest good potion to brew first?
Fire Resistance. Magma cream is common once you have seen a few magma cubes, the base duration is a generous 3:00 (8:00 extended), and it immediately makes Nether trips — for more wart, rods and quartz — far safer.
Can I brew potions without a Nether trip?
Not really: the stand needs a blaze rod and the base needs nether wart, both Nether-sourced. The exceptions are found potions — witch drops, igloo basement stands with potions nearby, End ship stands, and Bedrock witch hut cauldrons. One fortress trip sets you up permanently, though; see the portals guide and stock up once.
Conclusion
Blaze rod stand, blaze powder fuel, water bottles, nether wart, then one ingredient for the effect and one to shape it — that loop produces every potion in the game. Master the table above, keep a wart farm and a potion cauldron in your base, and the Nether, the ocean and the End all get noticeably easier. Pair your new potions with a proper enchanting setup and you are geared for anything the current version throws at you. For the full official reference, the Minecraft Wiki’s brewing page documents every recipe chain.